What are Jira schemes?
First, a scheme is a concept that has certain characteristics and can be applied to one or more cases over and over again. A Jira schema is a collection of values that can be used by one or more Jira projects. And this is precisely the power of schemes: the configurations you’ve spent a long time fine-tuning only need to be done once. As soon as a next project is created for which your configurations would be best suited, you can apply the created scheme for the new project with just a few clicks.
If you are an administrator with only a few projects, you may think that you would rather manually configure settings for each project individually. But once you manage numerous projects, adjusting settings manually (afterwards) is a time-consuming task. Jira schemes save time and provide standardized procedures.
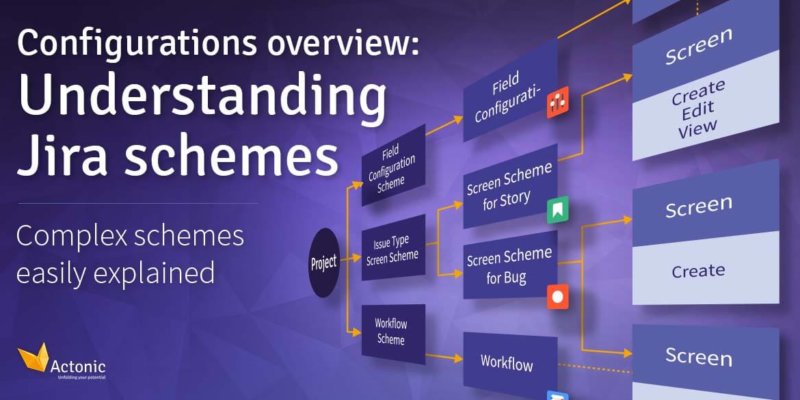
Here you can see an overview graphic we created about Jira schemes:
To better understand the graphic, let’s start at the smallest project unit (on the right) and work our way to the left until we arrive at the largest unit, “Project”.
Jira Fields and Jira Screens
On the far right of the graphic, you can see “Screens” and “Fields”. When Jira users in your team want to create a new project, they click on “Create” and see a screen similar to this one:
In our view, the fields “Project”, “Issue Type” and “Summary” are mandatory. The “Epic Link” field, on the other hand, is not required to be filled in. This default is not located in the screen, but in the setting of the field, the field configuration (in the graphic we now go one step to the left).
Field Configuration (Scheme)
You can configure the fields as you wish. For each field, you specify whether it is a required field, if you can enter text or numbers, and the overall appearance of the field. You define these settings in the field configuration. They can be put into a scheme to manage fields across multiple projects, issue types, and screen masks. So one scheme can be used for many cases and saves you from manually creating the layout for each new screen.
Note: The field configuration belongs to the field itself and not to the screen template!
Issue Type Screen Scheme
In our graphic, we move to the center, to the Issue Types and their schemes. An “Issue Type Screen Scheme” establishes the relationship between a project and the available issue types. This ensures that the correct screens are used for each issue type.
In our example, you can see two different configurations with different end results.
-
Screen Scheme for Story: A story has an arbitrary number of fields, which are created by “create”. When the story is viewed or edited later, exactly the same fields are present as when “create” was used. The advantage of the scheme is that you only need one screen!
-
Screen Scheme for Bug: Bug, for example, has only five fields in “create” that you can/must fill in. This is because the person reporting the bug usually doesn’t know very much about it. It may be that he or she is having trouble logging in. Now she can report that an error exists, but there is no knowledge about a known global error (like various IDs or the exact reason). That’s why there is a separate, minimalistic screen for creating a bug. If the bug is edited later, the editor may have 50 or more fields to choose from in the “view” and “edit” mode. Here, more detailed information like the description, the status and the exact reason can be recorded. However, these fields are no longer relevant for the person who created the notification. Separating the error message from its resolution speeds up the resolution process immensely.
Attention: You always have “create”, “edit” and “view” to choose from. You alone decide whether there are one, two or three different screens (per task type).
Workflow Scheme
Finally, our graphic shows the configuration of the workflow and its scheme. A workflow defines the sequence of steps that can be taken in a project. Often these steps are: to do → in progress → feedback → done.
The associated scheme places these defined assignments on an assigned issue.
As a Jira administrator, you can link task types with different workflows within a scheme and later apply them to other projects.
Extra tip: All workflows are inactive before they are assigned to a workflow scheme.
Project
A project now takes these schemes (like shoeboxes) and involves all configurations. By having Jira schemes configured, a project gets its specific settings and can be applied to the exact needs of your company or even a single department.
This is why you should use Jira Schemes
If you are a Jira administrator and are bothered by configuration conflicts of your projects and are looking for a quick and efficient solution, Jira schemes are the right tool for you.
Advantages of Jira schemes
-
Enormous time savings
-
Easy reuse of complex rules
-
Unified workflow
-
One change, many impacts: Apply to multiple screens and projects
-
Uncomplicated administration
-
Finally, full transparency in your overview
This graphic shows how clearly structured your administration view can be. The schemes are listed and can be configured by you with a few clicks — the changes take effect directly for all assigned projects!
Conclusion
Jira schemes are based on the useful recycling idea: once significant settings have been made, they can be reused again and again. This saves time and also makes it easier to modify settings for multiple projects later.
If you would like more information about Jira schemes, please feel free to contact us. Our highly qualified consultants are true experts in this field and will be happy to advise you at any time. Even for very individual problems. Convince yourself!


")

 Gain hands-on insights from live webinars